For my work colleague holiday gifts this year, I decided to stick with last year's jar theme but with a new twist: PIE.
Because, after all, who doesn't like pie?
And what could be better than pie in a jar?
Nothing, I tell you. Nothing is better than pie in a jar.
I looked at several methods for making pie in jar and liked the version over at Our Best Bites the most - simple, easy to follow and a fast process. It was a winner.
So you don't have to surf over to the site, here's how you can make your own Pie in a Jar.
Mini Pies in a Jar
To make mini-pies, you'll need 8 oz wide-mouth mason jars like these.
Make your favorite pie crust - or buy ready made at the store. My recipe is easier, and better, than store bought. You can learn how I make it here. Be aware that each pie crust will yield 3.5 - 4 jars of mini pies.
Roll out a single pie crust. Cut out the tops and set aside. Hint: Use the ring part of your jar as a cutter for the pie top.
Roll out a single pie crust. Cut out the tops and set aside. Hint: Use the ring part of your jar as a cutter for the pie top.
Use the rest of the dough to line the jars. You do not need to grease the jars first. Don't worry if the dough is perfectly shaped or flattened. Simply take small pieces of the dough and press it into the jar. Make sure the dough is pressed all the way up close to the top of the jar.
Now for the fun part - filling! You’ll need about 1/2 cup filling for each jar. I made my famous cherry pie for my coworkers. Yum-yum.
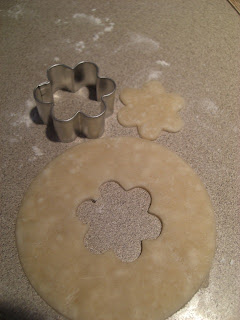
Before putting the top of the pie in, make sure your crust has a vent for steam to escape. You can use a small cookie cutter, like I did, or cut slashes for vents or build your own lattice.
When your top crust is ready, slip it onto the top of the pie. It will be slightly larger than jar, so the outside edge will curl up somewhat. Use your finger, or a fork to press the two pieces of dough together to seal.
Brush top with butter and sprinkle with sugar.
At this point, you have some options. You can put the rings and lids on and freeze your pies. How awesome would it be to bake a mini-pie whenever the mood hit you? (Answer from The Boy: Awesome. And why haven't you done this before?)
Of course, you can bake the pies immediately. Do not bake with the rings and lids on. But you knew that, of course.
Make your life easy and put all of the pies you want to bake on a cookie sheet. They'll be much easier to take in and out of the oven. Bake at 375 for 40-45 minutes. (If the pies were frozen, allow them to come to room temperature first.)
If you aren't serving these immediately, put the lids on the jars while the pies are still hot out of the oven. Allow the pies to cool to room temperature. This will help “seal” the pie, allowing them to stay fresh longer. (In case you want to bake on the weekend and give later in the week...or perhaps mail to soldiers overseas?) By "longer," I think they should be ok for 2-3 weeks. But I have no idea if this holds true for cream-based pies. Attempt at your own risk.
Anyway, fancy the final pies up with a little label...maybe a ribbon (I'm too lazy/busy for that).
Box 'em up and you're ready to go!
So what do you think? Are these the cutest pies ever or what?


Your great grandfather E. had a small jar of apple pie covered with real cream in his lunch pail nearly every day. He used to tease your gr grandmother that he married her for her pies!
ReplyDeleteThat's amazing! I'm so glad you shared that - it goes to show that what is old is new again (pies in jars) and that it's simply not possible to avoid learning something new about your family all the time.
ReplyDeleteLove you! See you tomorrow.