New Header

Image Map
Showing posts with label crafts. Show all posts

Thursday, December 27, 2012

Holiday Wrap Up: Part 2


Here's a fun idea (from Pinterest!) that I used to creatively wrap these:
 

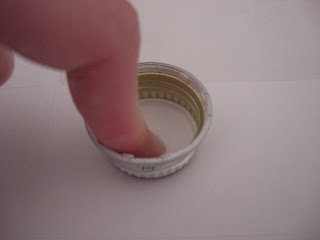
Run a bead of hot glue on the inside of a jar lid.


Hold the gift card in place until the glue sets. Allow to fully dry (about 10 minutes).


Add a sprinkling of glitter - not too little, not too much - inside the jar.


Fill with water.


I added some sparkly ornaments for decoration, then fastened the lid securely. Tie on a little piece of curling ribbon and Voila! It's a handmade gift card holding snow globe.


A couple of notes:
  1. I would use a clear jar rather than a quilted glass next time - easier to see into.
  2. The Boy pointed out that recipients have to destroy the snow globe to actually retrieve their gift...oh well. It's the thought that counts, right?!?

Wednesday, December 5, 2012

DIY Holiday Coasters

Bridget and I decided it would be fun to make some festive drink coasters for the Christmas season.
 

You'll need felt sheets (inexpensive at any craft store), fabric craft glue, scissors and felt ornaments. I picked up several packages of the ornaments for 75% off in last year's Christmas clearance sales.


Enjoy how soft and colorful the craft materials are...


Really, Bridget - this is ridiculous. People can't learn how to make anything this way.


Ok (getting serious now), liberally apply fabric glue to one side of the ornament and press the ornament onto the felt sheet.


Allow the glue to dry (I gave it two hours to make sure everything was set), then trim the felt sheet flush with the ornament.


Aren't they cute? And so so cheap to make...


I love them!

Wednesday, October 31, 2012

One More Thing...

The shirts the boys wore to run the Marine Corps Marathon?


I designed them - the back logo and all.

"Running 26.2 for the Red White and Blue"

The company that printed them liked the design so much they offered to trade me something for it. Because I was running behind, I got express processing and shipping in exchange for signing away my design to the company.

A fair trade, I'd say.

And my first-ever sale.

Tuesday, September 6, 2011

Literary Lovely

Long ago I bookmarked a tutorial on how to make a book wreath and finally got around to making mine over the Labor Day weekend.

I needed a distraction. The Boy said I have a problem sitting still and being.

He's right.

Anyway, to make a book wreath you need craft paint (black, grey or brown), a book that you don't care about (I bought my bodice-ripper at a thrift sale), hot glue and a foam wreath. The tutorial called for a 10" wreath, but I used an 8" that I had sitting in my craft supply box.


Use a paper towel to rub paint on the edges of your book. Let it dry for about 10 minutes.


Rip the pages out of the book. (Relax: I flipped through Ten Things I Love About You and determined that it wasn't a literary loss to destroy the book.)

Working one page at a time, roll (don't fold) the pages and hot glue to the form. When you roll, make sure that the painted edges are facing out. In other words, the base of the roll that is glued to the form should be your unpainted edge.


Do this layer all the way around the form. This becomes the base of the wreath. Flip the form over to start the next layers, but make sure the wreath will lay flat. If it doesn't, use a heavy object to flatten the pages some.


For the next set of layers, continue rolling the pages but add a folded tab at the base. Put glue on the tab and press it to the form. Continue rolling, folding and gluing around the form. Complete each layer before beginning the next.


When you get to the center, roll and glue pages the way you did for the initial layer.

While the wreath looks nearly complete, you'll want to fill in the gaps where the tabs are very noticeable.


I should have mentioned earlier, make sure you have your resident furry supervisor there to monitor your use of the hot glue gun.


To fill in the gaps, roll a page, add glue to the end and stick it into the wreath. The page can either adhere to the form or to the other pages in the wreath - it will look good either way. You might want to use a pencil to press the page in rather than using your fingers. Trust me - the hot glue is very painful when it gets on your fingertips.


When you've finished filling in the wreath to your satisfaction, flip it over and add a bit of ribbon to serve as a hanger. Hot glue should suffice to hold the ribbon, but you can also add a couple of straight pins for added strength.


And that, my friends, is how you make a book wreath! Think of how cool it would be to make a wreath out of sheet music to hang above a piano...the possibilities are endless.


For more detailed instructions, click here to go to Living with Lindsay. Spend some time on her site while you're there - she's a great DIY resource!!

Saturday, September 3, 2011

Out of Control

It's craft chaos in the Hayley house.


But at least Ben loves me despite the mess.


The Boy isn't so sure.

Saturday, August 13, 2011

Weight Off My Shoulders

Last weekend I just finished a major 101 List item.

Three, actually.

Last weekend I finished scrapbooking our life in the UK. For a bit of context, we moved back to the US from the UK in fall 2005. That's right - nearly six years ago. It's a project I started working on in 2008.

And that's all I have to say about that.

Except maybe this - I am scarily close to being completely caught up on scrapbooking. It's all part of my obedience to The Boy's instruction to Finish a Project Before You Start Another Project. Good advice, eh?

Sunday, June 5, 2011

Scrapbooking Convention: Here I Come

This weekend was the Great American Scrapbooking Convention - conveniently close to home. And good for me, too, as this was one of my 101 goals.


I picked up my scrapbooking/paper-crafting mother-in-law and we headed to Arlington for two days of the three-day convention.

I have NEVER seen so many women in one place before - the queue to enter the convention show floor to shop stretched from one end of the convention center to the other. Unbelievable.


Of course, I've never known any scrapbookers to pass up photo opportunities!
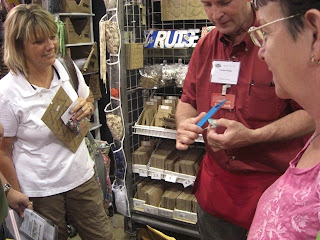

The show floor featured booth after booth of every type of scrapbooking/paper craft product imaginable. It was like one giant store.


I even spotted a few unfortunate husbands, drug along for the afternoon.


In addition to shopping, there were opportunities to "Make and Take." These were basic hands-on demonstrations to try new products and techniques.


And plenty of sales staff eager to demonstrate the newest things - including flexible adhesive sand and distressing tools.


In addition to displays and mini-sessions on the show floor, for an extra cost you could sign up to take specialized workshops. I took two classes on digital techniques. Who knew that a girl who uses Photoshop nearly every day at work still had so much to learn!?


All in all, the convention was a great experience. I think in the future I'd skip shopping the convention show and stick with the classes.

Despite The Boy's teasing, I'm not much of a shopper. But I'm always ready to learn a new thing or two.

Wednesday, May 25, 2011

Easy Being Green: Be Organized

I was thinking about our continuing need to organize the pantry the other day. After taking a look at the multiple demands on our budget, I decided that I needed to be more financially creative in my storage solutions.

And wouldn't you know that I had a lightbulb moment while rinsing out an empty spaghetti sauce jar!

I have a good assortment of empty jars - pickled jalapenos (The Boy's), spaghetti sauce, olives and the like. Remove the labels, clean well (in a hot dishwasher), air dry and relabel - voila! A new storage container is born.


Cute, huh?

But why stop there? A cute idea is even cuter if you go completely crazy and make something fun for houseguests. Like this:


Enter one empty Perrier single-serve bottle - cleaned and label removed:


Print labels with text of choice (fun fonts are a bonus!):


Cut labels to fit:


For extra durability, cover your label with a light coat of Mod Podge. Let dry completely.


Fill with mouthwash and display:


Guests will especially appreciate the little nod to Alice in Wonderland:


Great, right?

Thursday, May 19, 2011

Fruit of a Quieter Schedule

I can tell that my life has slowed down to a more reasonable pace. (And that's a good thing!)

I finally finished scrapbooking Hayley Life 2009...now on to 2010, but not before detouring back to finish scrapbooking our time in the UK {hanging head in shame: that was 2005 and 2006}.


But hey - at least it's another 101 List item done, right?

Sunday, March 6, 2011

Did You Know?

Were you aware that March is National Craft Month?

{Did you care? Anyway...}

I was not aware. This totally explains why I've been neglecting my crafting stack:

Tuesday, December 21, 2010

A Very Sweet Treat

I wanted to do something slightly different than my typical baked goods for workplace gifts this year.  In searching through blogdom I found a creative idea: cupcake jars!

The hardest part of the gift was tracking down half pint wide mouth jars like these:


Next year, I'll definitely stock up on these during the summer months when coupons drop the price on a box of dozen to less than $10.

Anyway, wash your jars (and lids) and let dry thoroughly.

Fill the jars about halfway full with your favorite cupcake recipe. You need to allow room for the cake to expand, as well as room for frosting. It's difficult to judge the bake time required, so monitor and use a toothpick to judge when they are ready (just a few crumbs should stick to the toothpick after inserting into the center of the cake).

Since I was fancying these up, I used an apple corer or a knife to make a small well in the center of each cake:


Then I poured in a bittersweet chocolate ganache...yum:


Finally, I topped it all with a homemade peppermint buttercream icing and a few sprinkles of crushed peppermint stick:


Pop the top back on, stick on a label, tie a bit of ribbon and you're good to go!


Note - these aren't forever-shelf stable. They'll last a couple of days on the counter at room temperature and a few days longer in the refrigerator.

Cute and yummy, huh?!?

Interested in a detailed how-to? I found my recipe for Peppermint Cupcake Jars here.